To find the Zoom links for the main DroneCamp, refer to your confirmation email.
Participating in DroneCamp
Participating in DroneCamp
Getting the Zoom Links
DroneCamp will use a few different Zoom links. A Zoom account is not needed (see Zoom Tips below).
Refer to your confirmation email for the Zoom login links. Please save that email! The connection link is unique to you, and you’ll need it to join the session(s).
Being Safe & Principles of Community
Virtual courses like DroneCamp remove many of the geographic barriers for participation, but they also involve new ways of interaction. Just like in-person events, we ask all participants to practice the following general guidelines for community. Note – We will be recording sessions for educational and promotional use by the University of California. Your mics and videos will be turned off for majority of the event.
Mutual Respect
Everyone is welcome regardless of their background or skill level. Please treat each other and all instructors with mutual respect. People learn with different styles and at different paces; instrucors will do their best to accommodate everyone.
Sharing Personal Information
Be cautious about sharing any personal information in chat, Q&A or verbally during sessions Anything you share online could in theory be saved and shared with others. Chat history is also captured in session recordings.
Reporting Inappropriate Content and Behavior
If you’re concerned about chat messages or any other kind of inappropriate behavior, first send a private chat message to the session facilitator (host). You may also share concerns by sending a message to [email protected]
Questions & Answers
We have collected and answered a number of questions throughout DroneCamp. If you asked something during the webinar and didn’t receive an answer, view the Q&A document or send us an email.
Software Preparation Instructions
Preferred Approach – Amazon AppStream
We are pleased to announce that we have a new and greatly simplified system for accessing and completing the hands-on computer portions of DroneCamp.
- During the week of DroneCamp participants will receive instructions to log into Amazon AppStream, where you will have access to a virtual desktop computer with all of the necessary hands-on exercise software and data already set up for you.
- AppStream is delivered through a browser, so it will work on your Windows, Mac, or Linux PC.
- Also during the week of DroneCamp you will receive information to log into the ArcGIS application sessions.
There will only be licensing step that you will need to take in order to be prepared for the Pix4DMapper exercise:
- You will need to apply for a trial Pix4DMapper license (if you do not already have a Pix4D username and password). For instructions, go to: https://support.pix4d.com/hc/en-us/articles/115002439163. click Sign up and follow the prompts.
- After you are done, Pix4D will send a confirmation email to you to verify your account.
- In-person participants will have the option of using a fully functional institutional account. Further login details for in-person participants will be provided on the day of the workshop.
***
Alternative (not recommended) Approach – Download and Install Applications
Alternatively, and likely not as convenient for most participants, below you will find instructions on how to download and install all of the software applications that we will be using during DroneCamp’s practical hands-on exercises. Note – Tech support for the following setups outside of App Stream will be limited.
Prior to proceeding further, ensure that your personal computer (PC) is not Apple IOS. The vast majority of drone image processing and GIS software applications are not compatible with Apple IOS machines; therefore we are unable to support Apple computers at DroneCamp.
To ensure that these applications are correctly operating on your computers, we have additionally included “Step Zero Exercise” instructions for each app. To avoid issues that could likely arise on the day(s) of the hands-on DroneCamp sessions, please compete these exercises at your earliest convenience, which will allow time to receive tech support from our team if needed (see Tech Support schedule below).
Hardware Requirements:
- Prior to proceeding further, ensure that your personal computer (PC) is not Apple IOS. The vast majority of drone image processing and GIS software applications are not compatible with Apple IOS machines; therefore we are unable to support Apple computers at DroneCamp.
- Your PC must have at least 8GB RAM, a multi-core CPU (i5 or i7 or equivalent), and approximately 30GB of free hard drive space; to accommodate the data that will be used during the hands-on sessions.
You will quickly discover that drone data is “big data”. Each practical session will require you to download a considerable amount of data, which we have compressed into .zip files and placed on Google Drive for your access (totaling approximately 13GB).
- Please create a file folder on your C:\Drive named “DC2025” (not on the Desktop)
- Download the following exercise data files, and
- Cut and paste the data files into the DC2025 folder in advance of the hands-on sessions.
Next – you will need to unzip the file package inside of the DC2025 folder.
- If you do not already have decompression software installed on your PC, we recommend 7-Zip. To download and install 7-Zip, go to the following linked address, select the appropriate download option for your machine (most likely for Windows, 64- bit x64):
- Once the following files have been placed in your DC2025 folder, right click the files → select 7-Zip → Extract files → OK.
- After the files have been extracted inside your DC2025 folder, you can delete the zipped folder to free up hard drive space.
Please refer to the following linked folders for installation, data downloads and exercise instructions (including a step zero exercise for anyone not working on App Stream).
Zoom Tips
Zoom Tips
Setting Up Your Workspace
Try to find a spot which is comfortable and relatively free from distractions and background noise. Some people find a pair of headphones helps minimize distractions.
Ergonomics are important also! If you’ve ever tried to work on a laptop while sitting on a couch for 4 hours, it isn’t ideal. If you plan on multitasking, considering joining the audio via phone and headset so you have the option to move around.
Use the Zoom Client
Although you can join Zoom meetings through a browser, we recommend installing the Zoom Client for Meetings. You may already have it if you’ve used Zoom before, and you see it in the Start Menu (Windows) or Finder (Mac). Please make sure you have the latest version, as some of the buttons and features have changed.
Note: As of May 30 2020, Zoom will only allow you to connect to meetings with version 5.0 or higher of the Zoom client.
A Zoom account is not required. A webcam is not required.
Managing Zoom Audio
If you find your Zoom audio is garbled, perhaps due to poor bandwidth, you can dial-in with a phone. Click the microphone button on Zoom for details. In that case, you should disconnect from the the audio on your laptop or tablet (to prevent echo).
Muting and unmuting yourself are essential skills for Zoom. It’s generally good practice to stay muted until you have something to say. If you’re using the Zoom app on Windows, click the microphone button. If you’re using the Zoom app for phones and tablets, tap the middle of the screen to make the controls visible. If you dial-in on a phone, you can use the ‘mute’ button on your phone app, or dial *6 to mute or unmute yourself.
Viewing Zoom and GIS Software Simultaneously
Best Option: Dual Monitors
A second screen is very helpful, especially for hands-on workshops where you’ll be working through a software exercise. With a second screen, you can view the instructor’s slides or demo on one screen, and open your GIS program on the other.
If you have an external monitor for your laptop / computer, you’re all set. (Tip: turn on Zoom’s dual monitors option, see below). Many TVs can be pulled into service as a second monitor depending on the video ports.
If you don’t have a second monitor, a tablet may come in handy. You can only connect to Zoom on one device, but you can view the presentation & exercise instructions on the tablet as you work through the exercise on your laptop. Zoom is available as an app for all major tablets and phones.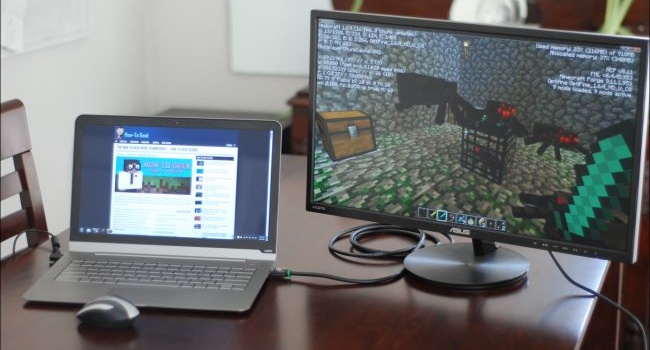
Connecting an external monitor to your computer is the best option for doing hands-on software workshops in Zoom
Tips for Using Zoom on a Single Screen
Tip 1. Print out the Exercise Guide
Many of the software workshops have some kind of exercise guide, shared as a PDF or a website, that the instructor will work through as you follow along. Printing the exercise guide might seem old-fashioned, but it will be one less window you have to manage during the workshop. Printing in black and white and on scrap paper will save ink and resources.
Tip 2. Turn on ‘Dual Monitors’
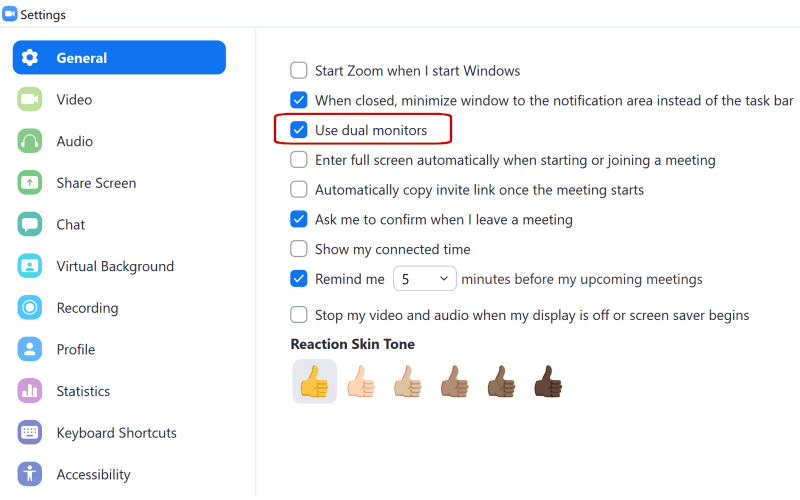
The Zoom client for Windows has a ‘Dual Monitors’ option that will open up screen shares in a separate window. You don’t actually need two monitors. This option is really useful on a single monitor, because you can move and resize the screen share window anywhere you’d like (and even ‘pin’ it to stay on top, see below).
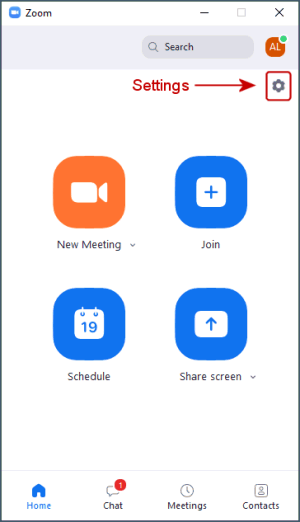
To turn on Dual Monitors, click the gear icon (Settings) in the Zoom client, then check ‘Dual Monitors’.
Tip 3. Place Windows Side-by-Side
You can arrange your windows so that you see both your GIS program and Zoom side-by-side (see below for example). You can devote the entire width of the Zoom window to the screen share by going to ‘View Options’ and making sure side-by-side mode is turned off.
A keyboard shortcut to move windows to the left or right is windows key + left/right arrows. You can then choose which of the remaining windows to put in the other half of the screen. By default, Windows will divide the screen into equal halves, but if you resize the width right after you use the shortcut, it will remember the setting.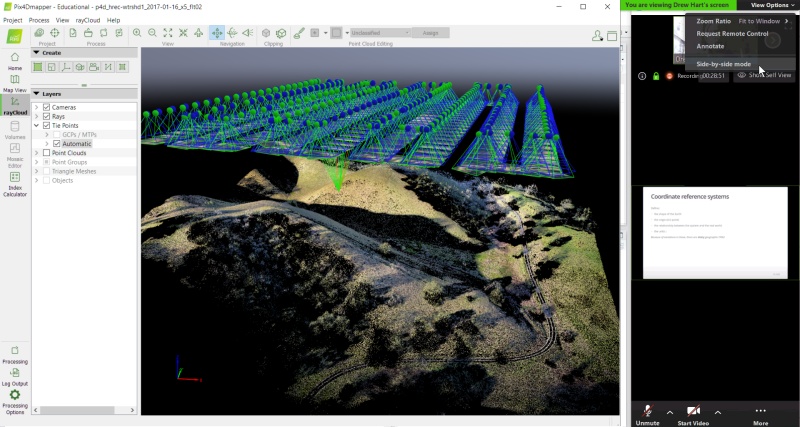
Arranging GIS and Zoom side-by-side on a single screen
Tip 4. Use Sticky Notes
If you like to take notes during Zoom meetings, a Sticky Notes utility can help. Almost all sticky notes programs have an option to stay on top, so you don’t have to worry about your notes disappearing. Windows has a built-in ‘Sticky Notes’ app, but an even better one is Stickies from Zhorn Software.
Tip 5. Keep Windows on Top with DeskPins
Surprisingly Zoom does not have an ‘always on top’ mode, but you can keep the Zoom client on top by using a 3rd party utility like DeskPins (Windows).
In conjunction with Zoom’s Dual Monitor options, DeskPins lets you ‘pin’ the screen share window on top, so you can watch the presenter’s demo while also working in your GIS program. Pinned windows can still be resized and moved around so it doesn’t get in the way of what you’re working on.
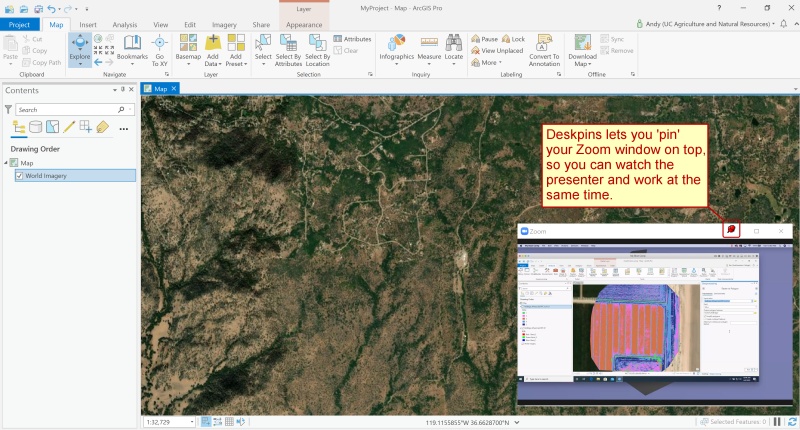
To ‘pin’ a window, right-click on the DeskPins icon in the system tray, and select ‘Enter Pin Mode’. To ‘unpin’ a window, simply click the little ‘x’ button that appears when you hover over the pushpin icon.
